Overview
A business always stands to gain from personalized communication with its customers, and WhatsApp Business makes this possible with its templates. WhatsApp templates are predefined message formats that allow businesses to send notifications to their customers. These templates help businesses maintain a consistent style and format in their communication, which in turn enhances brand identity and professionalism. Even though these templates are predefined, they aren't static; dynamic content like customer names, order details, and much more can be added to make them personalized for customers. Personalizing these templates based on customer preferences, interests, and previous interactions is more likely to receive a positive response. It also demonstrates attention to detail and a customer-centric approach, which enhances perception of the brand and differentiates it from competitors. Overall, personalizing WhatsApp templates allows businesses to have more impactful and effective conversations with their customers, resulting in increased interaction, loyalty, and, ultimately, business success.
To start your own personalized communication with your customer, begin by creating a personalized template with variable parameters, such as the customer's name, amount, invoice or credit note number, and more. Next, get it approved by WhatsApp (ensuring that it complies with both the WhatsApp Business Policy and the WhatsApp Commerce Policy). Lastly, send it to customers. These communication templates can be divided into two main categories.
Utility: This template will be about updating a customer about an ongoing transaction, transaction confirmations, and/or post-purchase notifications.
Marketing: This template will be about promotions, offers, or informational updates.

Create a WhatsApp template
Follow the steps below to create a template for Credit Notes, Payment Receipts, Customer Statements, Invoices, and Sales Orders.
Note
- Template Category could either be Utility or Marketing.
To create a Credit Note WhatsApp template:
- Navigate to Settings > Integrations, then click WhatsApp.

- Select Credit Notes under the Messages Template section.

- Click + New template. The Create WhatsApp template pop-up will appear

- Fill out the Template Name and select the Template Category.
- Mark the Include a PDF attachment along with this message checkbox if you want to include the invoice PDF in the WhatsApp message.
- Click the dropdown next to Language to choose the preferred language for your customers.
- Edit the content under the Message field if required. You can insert placeholders by clicking the dropdown next to Insert Placeholders.
- Click Save.


Template Approval
Once you create the template, it will be sent to the WhatsApp team for approval. It can take up to 24 hours for them to approve it. The status of the approval will be displayed on the list page.

A template can have the following statuses:
- Approve: The WhatsApp Business team approved the template, and it can be sent to customers.
- Rejected: The WhatsApp Business team rejected the template. Edit and resubmit the template for approval. Learn why templates get rejected.
- Pending Approval: The template has been sent to the WhatsApp Business team and is awaiting approval. It could take up to 24 hours for the status to be updated.
- Deletion in Progress: The WhatsApp Business team is evaluating your request to delete a template.
- Deletion Failed: The template was not deleted due to network issues. Initiate the delete process once again.
- Deleted: The WhatsApp Business team has deleted the template. This action cannot be undone.
Actions that can be performed on templates
Clone a WhatsApp Template
If you want to create a template similar to an existing one, you can clone it. The new cloned template will be sent for approval to the WhatsApp Business team and can be used once approved.
- Navigate to Settings > Integrations, then click WhatsApp.
- Select the module under Message Templates.
- Click the More icon next to the template you want to clone, then select Clone.

- Edit the necessary details in the following Clone WhatsApp Template pop-up, then click Save.


Set Template as Default
If you have a predetermined template that will be used frequently in communication, you can make it your default template. When you try to send WhatsApp notifications, the Template Name field will automatically be filled in with this default template, as shown in the image below:

- Navigate to Settings > Integrations, then click WhatsApp.
- Select the module under Message Templates.
- Click the More icon next to the preferred template and select Set As Default.


Delete a WhatsApp Template
You can delete a WhatsApp template if you do not require it.
Note
- Deleting a template is permanent and cannot be undone. However, you can create a new template again and send it to the WhatsApp Business team for approval.
- Navigate to Settings > Integrations, then click WhatsApp.
- Select the module under Message Templates.
- Click the More icon next to the template that you want to delete.
- Click Delete from the dropdown to proceed.


A request will be sent to the WhatsApp Business team to delete the template, which will subsequently be deleted.
Enable WhatsApp Notifications
Once you create the template, you can enable the notifications for
- Sales Transactions
- Customers and Contact Persons
- Customers in Bulk for All Contacts
- Customers in Bulk for Specific Contacts
For Sales Transactions
- Navigate to Settings > Integrations, then click WhatsApp.
- Slide the toggle button next to the respective module.

You’ll be able to send notifications through WhatsApp for the modules that you have enabled.
For Customers and Contact Persons
- Go to Sales Channel > Customers.
- Select a customer for whom you want to send a WhatsApp notification.
- To enable it directly for the customer, click on Edit under the Overview section.

(or)
To enable it for the contact person, click on the gear icon under contact person section and select Edit.
- Ensure the number is correct with the proper country code and mark the WhatsApp option under Communication Channels.

- Click Save and WhatsApp will be enabled for customer and the contact person.


For customers in bulk
You can enable WhatsApp messaging for contacts in bulk in two ways. You can do it for:
- All primary contacts and contact persons
- Specific primary contacts and contact persons
To enable it for all the primary contacts and contact persons:
- Navigate to Settings > Integrations, then click WhatsApp.
- Click Update Communication Preference on the right, next to the gear icon.

- In the pop-up that follows, click
- Only Primary Contacts if you want to send WhatsApp notifications only to the primary contacts.
- All Contacts and Contact Persons if you want to send WhatsApp notifications to all contact persons, including the primary contact.

- Click >Save.


To enable it for specific primary contacts and contact persons:
- Navigate to Sales Channel > Customers.
- Select the customers you want to send notifications via WhatsApp, then click Configure Communication Preferences at the top.
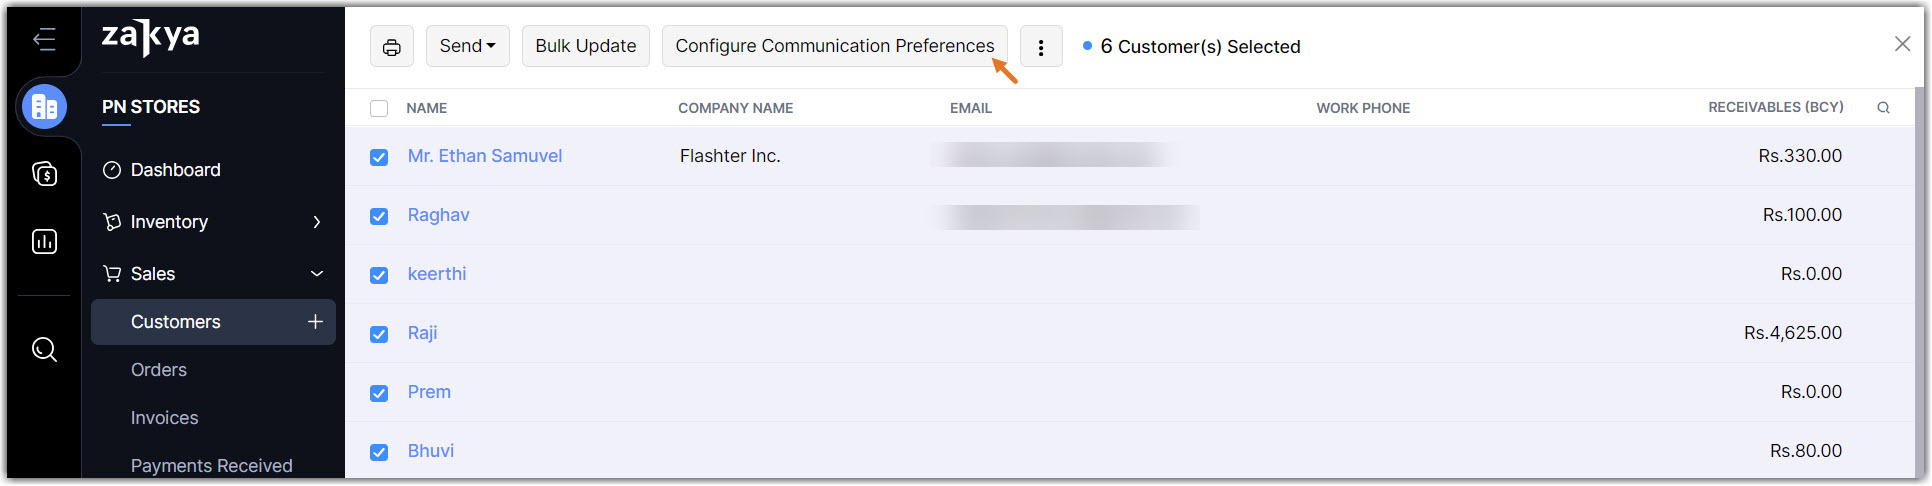
- Configure the default recipients for the WhatsApp channel type in the pop-up that follows.

- Click Save.


The WhatsApp notification will now be sent to the selected contacts.