It's important for businesses to differentiate themselves from their competitors in order to thrive and evolve. Though the Zakya mobile store can help you attract customers outside of your neighborhood, you will only be able to keep them if you deliver a better shopping experience than your rivals. To provide a better shopping experience in your mobile store, you need to understand your target audience and design a user-friendly layout that customers can navigate quickly.
The app builder in the Zakya mobile store can help you achieve this. Using the app builder, you can create a user-friendly mobile store with different sections, and customize it any number of times. The changes will reflect immediately once you publish. This can help you customize your store and experiment with various designs in order to create a mobile store that provides the finest shopping experience to your target audience.
Build your Store
- Navigate to Overview in the Mobile Store module, then click Customize App.


Once you click the Customize App button, you can start adding sections and customize the entire application.
Note
- A maximum of 30 sections can be added.
Home Layout Customization
You can customize the home page of your application on this page. There are three different sections in the Zakya Mobile Store (Banners, Items, and Categories).
Banner section
This section will help you share information about products, offers, discounts, shop timing, and more through banners on the home page of your mobile store. For customers visiting your mobile store to notice your banner, you can make one yourself and add it here.
The main aim of the banner is to grab your customer attention. Once you gain their attention, you can also encourage them to take immediate action by mapping one of these into your banner.
- External URL: To redirect the customer to a different webpage outside of the mobile store.
- Open Items: To redirect customers to a page with custom added items within the mobile store. For example, a page with all brands of biscuits.
- Open Categories: To redirect customers to a page with custom added categories within the mobile store. For example, a page with all the categories under a particular brand.
To create a banner:
- Click Add section, select Banners, and choose your preferred template from the Pick Banner Template option.

- Enter the name of the section in Section Name and click the checkbox next to Show section name if you want to show the name in the mobile store.

- Click Configure Now or Add Banner, then select Upload Banner to upload it from your device.

- Choose External URL, add the link in the External url option, and click Save.

- Choose Open Items, provide a title for the page in the Page title option, and select the items by selecting the checkbox next to them and click Save.

- Choose Open Categories, provide a title for the page in the Page title option, and map the categories by selecting the checkbox next to them. Click Save.

- Complete the customization and click Save.


After uploading the banner, you can map any of these actions to it.


Note
- You can add either four or five banners, based on the template you choose.
Items section
This section will help you group items of your choice. You can choose items irrespective of the categories and group them under the name of your choice to grab your customer's attention.
For example, if you wish to offer certain items at a discount, you can group them together and label them as a discount sale in the Item section. This enables you to capture your customer's full attention and increase sales.
- Choose your preferred template from the Pick Item Template option.

- Provide a name to the section in Section Name and choose:
- All items to list all the items under this section.
- Custom to list only particular items to the section by selecting the checkbox next to each item and click Save.


Categories section
This section will help you group different categories into one category. This one category will have all the categories mapped into it, from which your customers can navigate to their products.
For example, if your customers are more into buying branded products, you can group different brands with items into a single category and label them as Top Brands using the Category section. Instead of searching for the brand names, your customers can simply navigate to their preferred brand using this section.
- Click + icon and select Categories.
- Choose your preferred template from the Pick Category Template option.

- Provide a name to the section in Section Name and choose:
- All Categories to list all the categories under this section.
- Custom to list only particular categories to the section by selecting the checkbox next to each category and click Save.


Apply theme
Your store's theme displays your brand and beliefs. You can customize your theme by adjusting the appearance of each section's color, shape, size, spacing, and arrangement. This change in appearance can also make them stand out among other competitors.
Note
- The modification choices for themes will differ depending on the section and template chosen.
- Navigate to the section and click the theme icon.

- Modify the choices to make changes to the theme and click Save.

You can follow the same steps to change the appearance of every section (Banners, Items, and Categories) and click Publish to reflect the same on the live application.
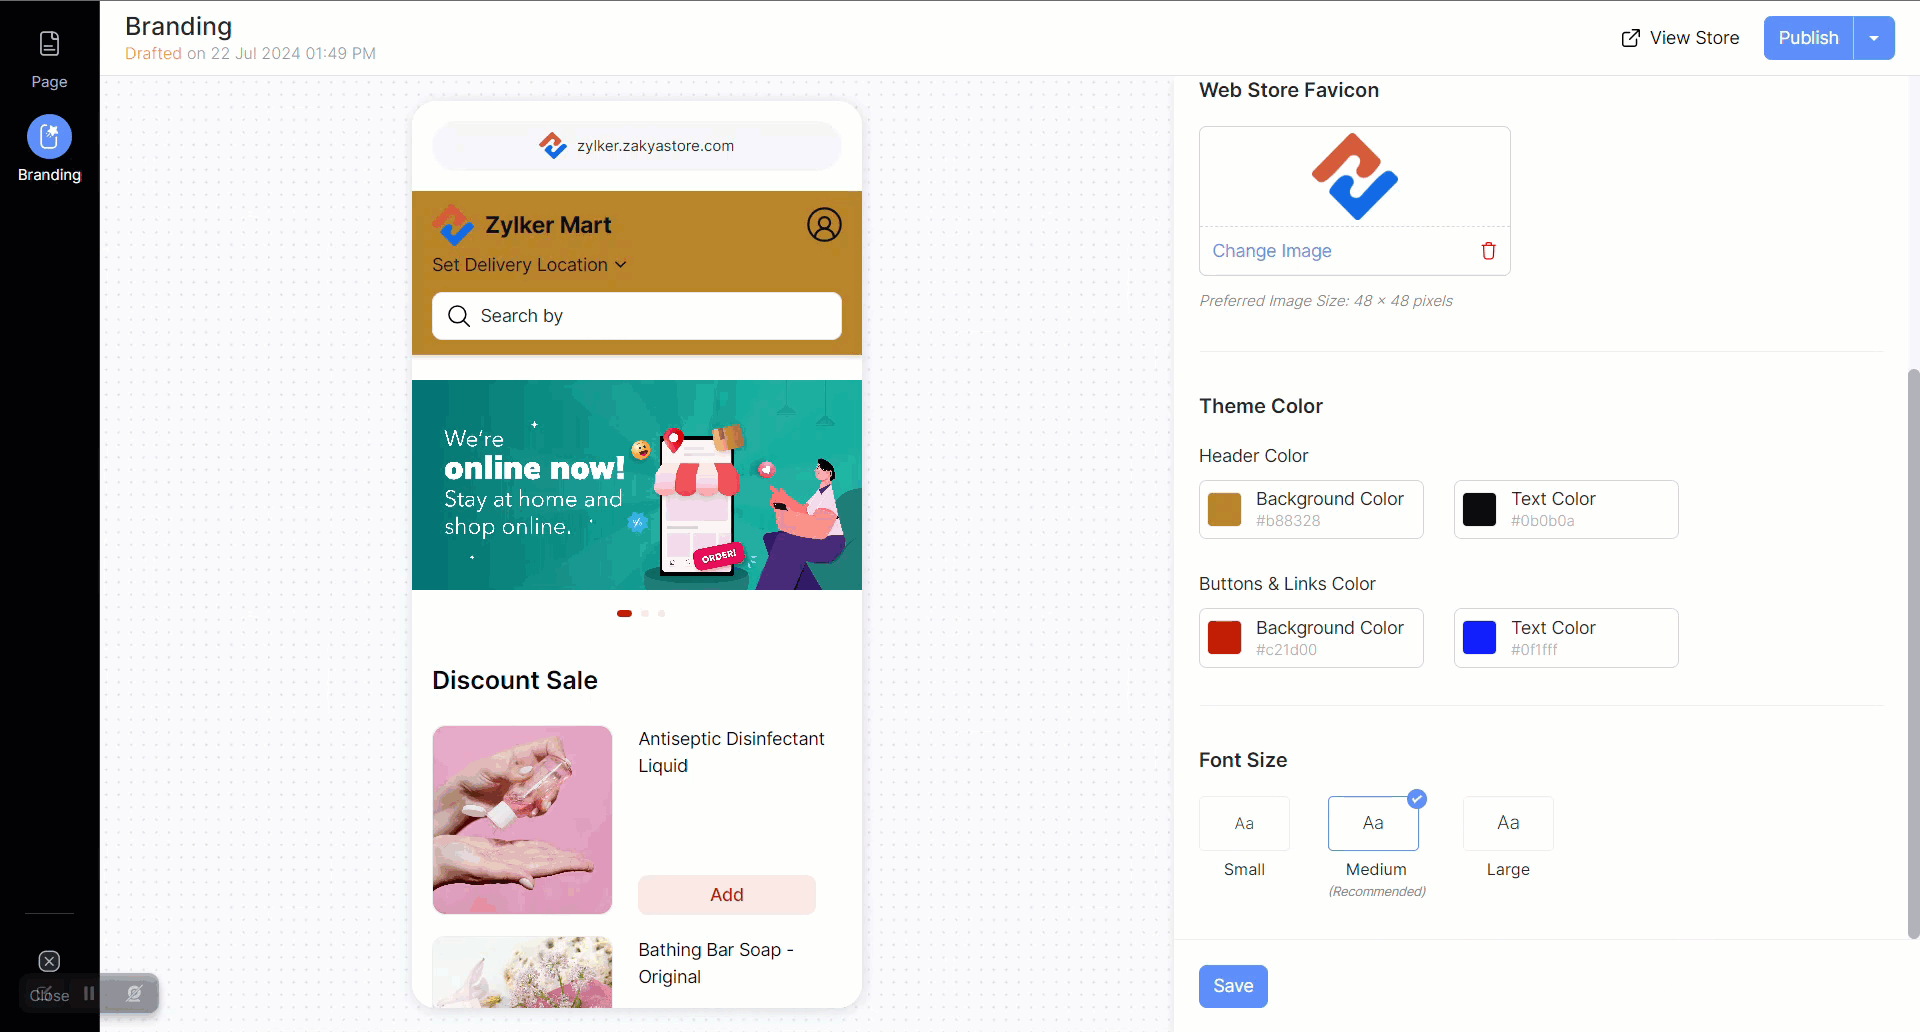
Branding Customization
Every brand has its own theme. You can reflect your brand's personality in this branding tool by adding a logo, background, text colors, and font sizes for your online store.
- Navigate to Branding.
- Store Logo: To add the logo of your store to show it on your mobile store. Enable the checkbox next to the Show logo on the header and upload your logo.

- Webstore Favicon: To show your logo in the address bar, which distinguishes your mobile store from other browser tabs.

- Header Color: You can choose the background and text color for the header of the mobile store.
- Buttons & Links Color: You can choose the background and text color for all the buttons and links in the mobile store.

- Font Size: To choose the overall size of the fonts present in the mobile store.

- Modify these options to customize the mobile store's overall appearance, click Save, and then click Publish.


Reset Changes
Before publishing, all the edits and modifications will be in the Drafted state, shown in the top-left corner of the customization screen. Since the changes are drafted, you can experiment with different templates and themes until you get the required customization. Yet, if you want to restart the customizing process, you can choose Reset Changes to restore the changes to the most recent published version of your mobile store and start again. However, after the new changes are published, you will no longer be able to restore your previous version of the mobile store.
Note
- The Reset Changes option is also available for both the home layout and the branding page.
Publish & Review
Note
- All changes made to the Home Layout and Branding must be published individually.
All the changes and modifications made to both the Home Layout and Branding are drafted, which means they will not be reflected on the live application. So, if you want to take your changes to your live mobile store, click Publish. Once published, you can click View Store to visit the store as a consumer and review the changes you have made.